Generate Certificate by Private CA
1. Deploy Private CA Using OpenSSL
OpenSSL is selected for private CA for its simplicity. It’s deployed in the local Ubuntu server to generate the certificate for Intranet web app only. This Ubuntu server is offline by default.
1.1 Set up the Folder Structure
mkdir -p /etc/my-ca/{certs,crl,newcerts,private,requests,archives}
chmod 700 /etc/my-ca/private
touch /etc/my-ca/index.txt
echo 1000 > /etc/my-ca/serial

##########

root@local:/etc/my-ca# tree -LR 1
.
├── archives     # archive the CSR & san.cnf which are already signed.
├── certs        # store the certificates generated
├── crl          # stores Certificate Revocation Lists (CRLs)
├── index.txt    # tracks issued certificates
├── newcerts     #
├── private      # stores the private key of the CA
├── requests     # store the CSR & san.cnf for certifiacte issuing
└── serial # tracks the serial numbers of issued certificates1.2 Generate the Root CA Private Key and Certificate
openssl genrsa -aes256 -out /etc/my-ca/private/ca.key.pem 2048
chmod 400 /etc/my-ca/private/ca.key.pemIt prompts to ask for a passphrase to secure the private key.
root@local:/etc/my-ca# openssl req -x509 -new -nodes -key /etc/my-ca/private/ca.key.pem -sha256 -days 3650 -out /etc/my-ca/certs/ca.cert.pem
Enter pass phrase for /etc/my-ca/private/ca.key.pem:
You are about to be asked to enter information that will be incorporated
into your certificate request.
What you are about to enter is what is called a Distinguished Name or a DN.
There are quite a few fields but you can leave some blank
For some fields there will be a default value,
If you enter '.', the field will be left blank.
-----
Country Name (2 letter code) [AU]:CN
State or Province Name (full name) [Some-State]:Liaoning
Locality Name (eg, city) []:Dalian
Organization Name (eg, company) [Internet Widgits Pty Ltd]:MY_PRIVATE_CA
Organizational Unit Name (eg, section) []:.
Common Name (e.g. server FQDN or YOUR name) []:my.private.ca
Email Address []: 2. CA Issues Certificate for Sites
2.1 Create a Certificate Signing Request (CSR) on the Intranet Server
# Generate the server private key

openssl genpkey -algorithm RSA -out server.key -pkeyopt rsa_keygen_bits:2048

# openssl.cnf content

[req]
distinguished_name = req_distinguished_name
req_extensions = req_ext

[req_distinguished_name]
commonName = Common Name (e.g. server FQDN or YOUR name)
commonName_default = SERVER_IP
organizationalUnitName = Organizational Unit Name (e.g. section)
organizationalUnitName_default = DEPARTMENT OR BUSINESS UNIT NAME
organizationName = Organization Name (e.g. company)
organizationName_default = COMPANY_NAME
localityName = Locality Name (e.g. city)
localityName_default = Dalian
stateOrProvinceName = State or Province Name (full name)
stateOrProvinceName_default = Liaoning
countryName = Country Name (2 letter code)
countryName_default = CN
countryName_min = 2
countryName_max = 2

[req_ext]
subjectAltName = @alt_names

[alt_names]
IP.1 = SERVER_IP

# Generate the CSR file

openssl req -new -key server.key -out server.csr -config openssl.cnf -batch

# Inspect the CSR content

openssl req -in server.csr -noout -textBy adding the batch keyword, CSR file is directly generated based on the defaults in the cnf file.
Transfer the CSR file to CA server.
2.2 Sign the CSR with the Private CA
Create a san.cnf file in the requests folder. The content is similar to the following.
[ req ]
distinguished_name = req_distinguished_name
req_extensions = v3_req
prompt = no

[ req_distinguished_name ]
CN = Intranet_IP # replace to the real IP

[ v3_req ]
keyUsage = keyEncipherment, digitalSignature, dataEncipherment
extendedKeyUsage = serverAuth
subjectAltName = @alt_names

[ alt_names ]
IP.1 = Intranet_IP # replace to the real IP
Sign the CSR file.
cd /etc/my-ca/requests

openssl x509 -req -in server.csr.pem -CA /etc/my-ca/certs/ca.cert.pem -CAkey /etc/my-ca/private/ca.key.pem -out /etc/my-ca/certs/server.cert.pem -days 365 -sha256 -extfile server.san.cnf -extensions v3_reqCheck the certificate and send the certificate back to the Intranet server.
openssl x509 -in server.cert.pem -text -noout

# locate the CA cert and replace the path below
openssl verify -CAfile ca.cert.pem SERVER_IP.cert.pem If the CSR file already includes a Subject Alternative Name (SAN) extension, a san.cnf is still required. Otherwise, there is an error from the browser. The CA private key password is required when signing the cert.
# Chromer

This server could not prove that it is SERVER_IP; its security certificate does not specify Subject Alternative Names. This may be caused by a misconfiguration or an attacker intercepting your connection.

# Firefox

Websites prove their identity via certificates. Firefox does not trust this site because it uses a certificate that is not valid for SERVER_IP:9443.

Error code: SSL_ERROR_BAD_CERT_DOMAIN3. Configure the Intranet Server
Add the SSL certificate config in the Nginx config file.
server {
    listen 8090 ssl;
    server_name SERVER_IP;   # replace with IP or domain name

    ssl_certificate /etc/nginx/certs/dlc.10.124.159.18.cert.pem;
    ssl_certificate_key /etc/nginx/certs/dlc.10.124.159.18.key.pem;

    # SSL/TLS Security Settings
    ssl_protocols TLSv1.2 TLSv1.3;
    ssl_prefer_server_ciphers on;
    ssl_ciphers HIGH:!aNULL:!MD5;

    # Enable HSTS
    add_header Strict-Transport-Security "max-age=31536000; includeSubDomains" always;

    location / {
        proxy_pass http://APP:Port;  # Proxy to App
        proxy_set_header Host $host;
        proxy_set_header X-Real-IP $remote_addr;
        proxy_set_header X-Forwarded-For $proxy_add_x_forwarded_for;
    }
}Verify Nginx conf file and reload Ngnix.
root@c8c1e5a6e805:/# nginx -t
nginx: the configuration file /etc/nginx/nginx.conf syntax is ok
nginx: configuration file /etc/nginx/nginx.conf test is successful
root@c8c1e5a6e805:/# nginx -s reload
2025/06/20 08:10:17 [notice] 60#60: signal process started4. Install Private CA Certificate in Windows
Add the private CA certificate to the Trusted Root Certification Authorities store.
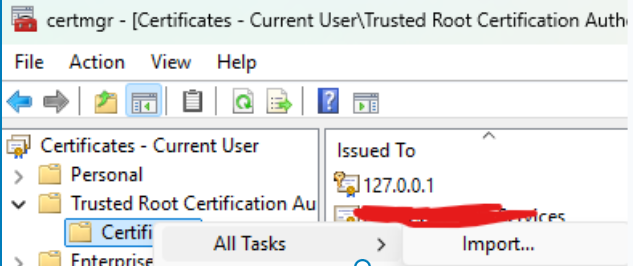
However, the pem format is not supported by Windows.
openssl x509 -outform der -in ca.cert.pem -out ca.cert.crtOr install the certificate in the browser. Take Chrome as an example.
